


gestionnaire de champs de formulaire
1500 CFA
- 1 an de mises à jour
- Nouvelle version gratuite
- Utilisation illimitée du domaine
- Télécharger Scanné par Norton & McAfee
- Vous recevrez des fichiers intacts et non modifiés.
- Nous achetons et téléchargeons auprès des auteurs originaux.
- Le même produit que les offres du vendeur sur leur site officiel.
- 100 % exempt de virus / logiciels malveillants / scripts malveillants / porte dérobée
- Satisfaction ou remboursement garanti à 100 %
Description
gestionnaire de champs de formulaire
Bienvenue dans Form Field Manager 101 – l’endroit où apprendre comment commencer et utiliser l’un des add-ons GiveWP les plus puissants.
Qu’est-ce que le Gestionnaire de champs de formulaire ?
Form Field Manager, ou FFM en abrégé, est un add-on GiveWP premium qui vous permet d’ajouter des champs de formulaire personnalisés à vos formulaires de don GiveWP. Les champs de formulaire comprennent des champs simples tels que des cases à cocher, des listes déroulantes, des radios, etc. Les champs de formulaire les plus complexes que vous pouvez ajouter sont les champs de téléchargement de fichiers et le puissant champ de répéteur.
Si vous n’utilisez pas FFM, la seule façon d’ajouter des champs de formulaire personnalisés à GiveWP est d’utiliser du code PHP personnalisé. Avec FFM, vous disposez d’un moyen simple mais puissant (et sans code !) d’ajouter un ou plusieurs champs personnalisés à vos formulaires de don.
Installation et activation
La première étape de la mise en œuvre du Gestionnaire de champs de formulaires avec GiveWP consiste à télécharger et à installer le module complémentaire Form Field Manager. Vous devrez également activer votre licence Form Field Manager afin d’obtenir des mises à jour en un clic et d’accéder à notre support prioritaire.
Gestionnaire de champs de formulaire pour le générateur de formulaires de don visuel
Le module complémentaire Gestionnaire de champs de formulaire déverrouille plusieurs champs personnalisés que vous pouvez utiliser dans la création de vos formulaires (à l’exception du bloc Champ de texte, qui est disponible même sans le Gestionnaire de champs de formulaire).
Tous les blocs ont également des paramètres individuels uniques à chacun d’entre eux. Dans l’onglet de construction, vous pouvez afficher cela en cliquant sur le bloc personnalisé et en affichant le côté droit du Visual Form Builder.
Pour leurs paramètres individuels, presque tous les blocs de champs personnalisés peuvent être rendus obligatoires (à l’exception du bloc Consentement, qui est requis par défaut). Tous peuvent également être affichés de manière conditionnelle en fonction de la valeur d’autres champs à l’aide de l’option Logique conditionnelle dans les paramètres du bloc.
Fields and what they do:
- Checkbox – This custom field displays a checkbox that will enable you to include some simple yes/no choices.
- Consent – This custom field block displays the terms and conditions that the donor must accept before the donation can be submitted.
- Date – The Date custom field block enables you to allow donors to enter dates in the form. You can also modify the formatting of the date using the block settings.
- Email – Not to be confused with the default email block that comes with every form, the email custom field block is another option that you can utilize to allow the donors to enter another email address.
- File Upload – The File Upload custom field block allows your donors to upload a file to accompany their donation. The block settings for this custom field will also enable you to set a maximum file size and set the allowed types of file that can be uploaded.
- Hidden – The hidden custom field block will enable you to include an invisible field on the form. It will not show up on the front-end, but it will appear on the donation details.
- HTML – The HTML custom field block allows you to insert HTML code snippets into your form. Whether this is a custom input field that you made or something you just want to display, the HTML custom field block gives you more customization options than any other custom field block.
- Multi Select – This custom field block enables you to allow donors to select multiple options from a list of items that you can define. You can display them as checkboxes or as a dropdown.
- Phone – The phone custom field block, not to be confused with the Donor Phone block, is a custom field that you can utilize in your form for the donors to be able to enter another phone number. The phone number can either be formatted or not.
- Radio – Lorsque vous souhaitez que vos donateurs sélectionnent une option parmi une liste, le bloc de champ personnalisé Radio est la solution.
- Zone de texte – Vous pouvez utiliser ce bloc de champ personnalisé si vous avez besoin d’un champ qui permettra à vos donateurs d’inclure des informations qui seraient autrement trop nombreuses pour les champs de texte normaux.
- URL – Ce champ permet aux donateurs d’entrer l’URL d’un site Web.
Gestionnaire de champs de formulaire pour les formulaires basés sur des options
Une fois installé et activé, le Gestionnaire de champs de formulaire ajoute une section (techniquement appelée métabox) à tous les écrans d’édition de formulaire de don individuels :

Lorsque vous créez ou modifiez un formulaire de don existant, vous verrez la métabox comme indiqué dans l’image ci-dessus. Cette métabox vous permet d’ajouter et de positionner les différents champs du formulaire. Pour en savoir plus sur chaque champ de formulaire individuel, consultez l’article ici.
Comment utiliser le Gestionnaire de champs de formulaire
L’utilisation du Gestionnaire de champs de formulaire consiste à ajouter, positionner et personnaliser les champs de formulaire requis. Le processus est conçu pour être intuitif et flexible.
Comment ajouter un champ de formulaire :
L’ajout d’un champ de formulaire est la première étape de la personnalisation de vos formulaires de don. Pour ajouter un champ de formulaire, cliquez sur le bouton correspondant au type de champ que vous souhaitez ajouter. Cela ajoute le champ à l’interface.

Editing a Form Field:
After you add a form field it’s important that you edit it to suit the needs of your requirements. To edit a form field:
- Click to expand the field’s options if it is not expanded already
- Add a “Field Label” to give the field a heading/label on the front end of the form.
- Fill out the remaining options depending on field type.

Important: Every form field must have a label and meta key, and changing the meta key for fields that have already collected data will make that data very hard to retrieve.
Placement of the fields on the form
Form Field Manager allows for you to place custom fields into one section of each form. Using the dropdown menu below the field options, you can place fields in certain sections of the form.
Saving Form Fields
After you have customized your form fields and placed them on the site, don’t forget to save the donation form. Clicking “Update” in the Publish metabox will ensure all your changes are saved.
Conditional Logic and Field Visibility
Form Field Manager allows you to add conditional logic for displaying fields based on the value of other fields on the form. The “Field Visibility” option allows you to only display a field or section based on the value of another field on the form.
Field Visibility Example
To get an idea of how powerful this feature can be, consider this example.
An organization wants to invite all donors above $1000 to attend a catered reception. With the field visibility settings in Form Field Manager they can add in three fields which only display for the right donors under the right conditions.
Here’s how to configure the form:
Display a Section for Donors who Give $1,000 or more
The first field is a “Section” field. This helps indicate new information within your form. Set the conditional settings to to following:
- Visible when field
Donation Amount
- Condition
Greater than or equals
- Value
1000

Add some Content to the Section at the same time
Next, add an HTML with the same conditions to display below the Section. Now they will both appear for any donor that chooses to give $1,000 or more.

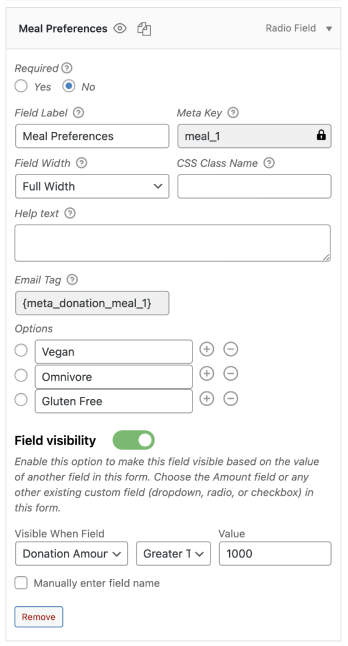
Ask for Meal Options with a Radio Field
Lastly, add a radio input for donors to select their meal preference. Choose the same field visibility options as above as well.
The final result would look like this for your donors:

Conditional Field Visibility Tips
The field visibility options are flexible and powerful. A few things to keep in mind:
Required fields are only required when displayed.
If a required field is hidden based on the value of another field, the form will submit without a value for the field. Don’t hide required fields unless you’re OK potentially getting donations without that data.
All Donation Form fields can be used to determine conditional visibility.
Any field can be used for conditional display, not just the three mentioned above. This means you can use the Donation amount, first name, comment, or any other field as the trigger to display your custom field. You can probably already hear your mind spinning at the possibilities. To use a field that’s not a checkbox, radio, or dropdown as the trigger, use your browser’s inspect tool while viewing the front of the form, and copy the “name” value into the Field Name input.

Viewing Custom Donation Form Field Data
Once you have set up your fields and collected data on a few donations, it’s time to view the custom field information.
You can view custom field data in your admin panel under GiveWP > Donations > (any individual donation with custom data). The data is contained within a metabox within each individual donation.

Note: Donations for donation forms that do not have custom fields will not display the Custom Fields metabox.
Si vous souhaitez apporter des modifications aux informations fournies par votre donateur, vous pouvez modifier les champs directement dans la métabox. Une fois que vous avez effectué les modifications, assurez-vous de cliquer sur le bouton Mettre à jour les champs pour enregistrer vos modifications.
Produits similaires


